In this article, we'll explain how to connect to your private OpenVPN server over SSH Tunnel to encapsulate the transmitted data for added security to your connection.
Requirements:
- Linux VPS or Dedicated Server running CentOS / RHEL / Almalinux.
- OpenVPN Server installed on your VPS/Dedicated server.
For more about OpenVPN server installation on CentOS / RHEL / Almalinux / RockyLinux, Check this Github repo or follow this article.
OpenVPN server must run on TCP protocol and port 443 is recommended. - Windows PC
- Putty SSH Client installed on Windows PC.
- OpenVPN Connect installed on your Windows PC.
Prepare the VPN profile
After you've installed OpenVPN server using the installation script mentioned above, the installation script will create the .ovpn profile on the server. Copy this profile to your PC (the profile must have ".ovpn" extension).
- Open the OpenVPN profile on your PC with a text editor
- Replace the line
remote 40.40.40.40 443withremote 127.0.0.1 8585
(127.0.0.1 is the localhost IP, and 8585 is the port to which the traffic will be forwarded from the PC to the server over the tunnel "you can use any available port number"). - Save the profile
Import Profile to OpenVPN Connect App
- Open OpenVPN Connect App
- Import the edited .ovpn profile
- Proceed to the next step
Open SSH connection with Port forwarding configured
We're going to open a normal SSH connection to the VPN server using Putty but with a small modification to Putty settings to configure the Port forwarding.
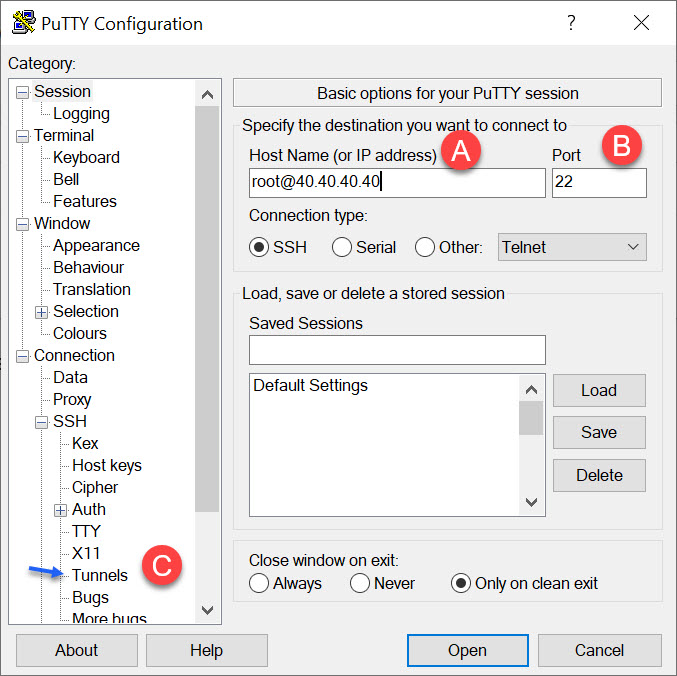
- Open Putty and follow the screenshots:

A: Enter the server IP address
B: Enter the SSH Port
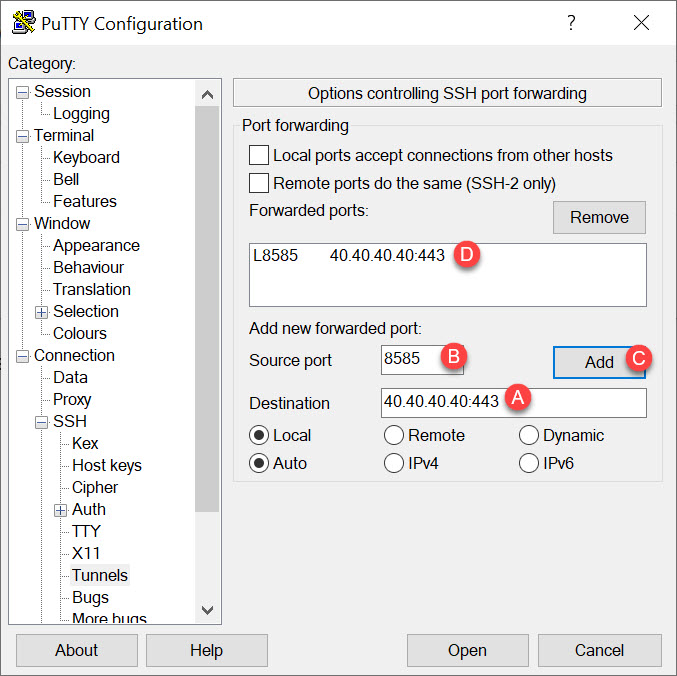
C: Click on Tunnels to configure port forwarding - From Tunnels, Configure port forwarding as follows:

A: Enter the VPN Server IP address followed by colon:followed by OpenVPN Server port number which in our case should look like40.40.40.40:443
B: Enter the port number added to the VPN profile, which in our case is 8585
C: Click Add button
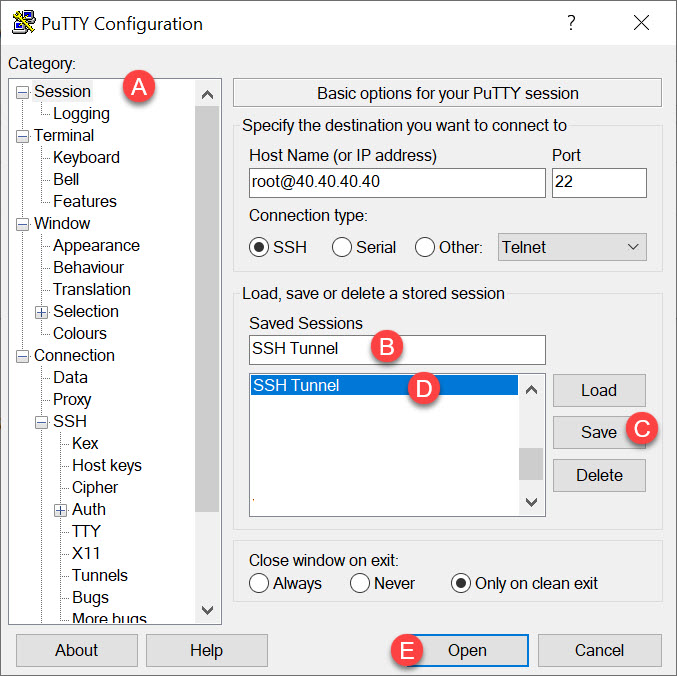
D: This is how it looks when the forwarded port is added successfully - Back to Session tab to save this SSH session so you don't have to do all this again:

A: Click on Session
B: Give this session a name
C: Click Save
D: This is how it looks when the session is saved
E: Click Open to Connect - You're now connected to the server over SSH! (Keep the SSH Session active, minimize Putty, and proceed to the next step)
Securely connect to VPN over SSH Tunnel
Now you've SSH Connection open on Putty, leave it open all the time while you're using the VPN.
- Back to OpenVPN Connect App
- Click the Toggle button beside the VPN profile to connect to the VPN server over SSH tunnel
- You're connected!
Video Tutorial
The above steps are all demonstrated in the following video.

